
Stories of the Stars: Antares. Artwork by Frank Paul

It is rather anticlimatic to go to all the trouble of calculating the three-dimensional co-ordinates of one's starmap, only to use it to create a flat-as-a-pancake printed map. But you brave souls who aren't afraid of some more math can use the following information to make your maps explode into the third dimension!
Types of Maps
I forsee two main uses of the following equations:
- Rotatable Maps
- This is a computer program capable of displaying a starmap on the monitor, and allowing the user to spin the map around its center in various directions in order to see the stellar arrangements. This is used in the MacSpin demo and the NearStar program.
- Stereo Twin Maps
- A map, either on the computer or printed, which when viewed in the proper manner presents the illusion of a three-dimensional object. There are many techniques, but all are based on the idea of presenting one eye with one picture, and the other with a slightly different picture.
- Stereo Twins
- Pairs of pictures which can be viewed by crossing one's eyes, "wide-eyed" viewing, or inserting the pictures into a stereoptican, ViewMaster, military surplus stereoscope, or similar device. If you need help learning how to view these images, go here. The images below were created with my source code below.
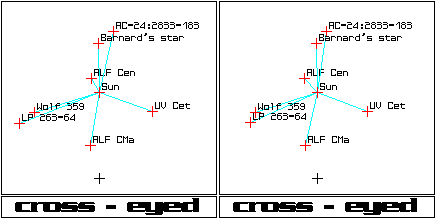
Cross-eyed stereo twins/pairs. 
Wide-eyed stereo twins/pairs.
- Anaglyphs
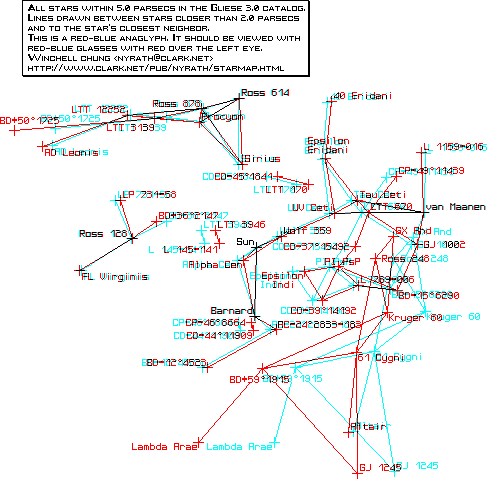
- Pairs of pictures are printed one on top of the other, one in blue ink, the other in red. Glasses with one red lens and one blue are used to view the image. Some movies use this technique using two projectors, each with a polarizing filter oriented at ninety degrees to the other. Polaroid glasses with the two lenses at ninety degrees to each other are used to view. Below-left is an anaglyph I whipped up, showing all the stars in the Gliese 3.0 catalog within 5.0 parsecs in equatorial co-ordinates, with lines drawn between stars closer than 2.0 parsecs. Here are some anaglyphs based on the Hipparcos catalog. (Please note that they are printed sideways). Thanks to James Fowler for bringing these to my attention. Also, check out the book 3-D starmaps for more anaglyphs. Reel 3-D Enterprises can supply you with red-blue anaglyph glasses, as well as a nifty book on how to draw anaglyphs with colored pencils. Rainbow Symphony has a wide selection of 3-D glasses, as does 3-D Glasses Direct. Or go here for a "free" set of anaglyph glasses. The image below was created with black and white version of the above stereo pairs, and merged with Adobe Photoshop.
Anaglyph. 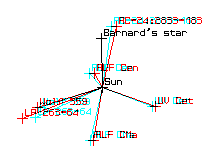
Anaglyph (red lens on left eye).
- "Magic Eye" Stereograms
- The pairs of pictures are merged in patterns of random dots. This is not very well suited for starmaps, as the pictures are very grainy.
- Liquid Crystal Shutter Goggles
- This uses very expensive hardware, but it quite striking. A computer is programmed to alternate between two images displayed on the monitor, alternating very rapidly (tens of cycles per second). Special liquid crystal goggles are capable of alternately blacking out one eye, then the other, in synch with the monitor. Chances are, if you own such equipment, you either know the following equations already, or have access to software that will do the job for you. If you are interested in this equipment, check out Christoph Bungert's mavelous Stereoscopic 3D Homepage.
Of course, I'm sure that some of you fiendishly clever starmappers out there will come up with other uses for this stuff!
Brace yourselves...
Now comes tons of complicated and confusing equations! I'll try to make this as simple as possible. And I trust you will forgive me if I concentrate on the equations proper and totally ignore such nicieties as the derivation of said equations, why they work, and similar issues. (Translation: I personally do not know how to derive them, nor why they work) I'm sure that the interested reader can find entire textbooks on the subject.
Also note that I could have made serious mistakes in the following exposition due to my unfamiliarity with the subject matter. Use these equations at your own risk, and please email me if you spot an error!
Pesky Definitions
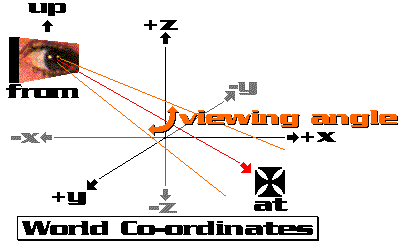
World co-ordinates.
Eye co-ordinates.
- World Co-ordinates
- We start with a list of all the stars that you have painstakingly translated into x,y, and z co-ordinates. We are going to refer to these as being in World co-ordinates. The x-y plane is horizontal, with the positive z co-ord extending upward.
- From
- Next, we choose a point where our eye will be mathematically located. Typically this will be user settable by the program incorporating these equations. This will be refered to as the From point, located at FromX, FromY, FromZ in World co-ordinates. In order to make a starmap spin, you will have to incorporate some method of allowing the From point to orbit the starmap. Note that for creating a stereo twin pictures as opposed to a rotatable starmap, one will have to have two sets of From points, one for each eye. The magical equations will have to be run on each star point twice, once for the left eye, once for the right. The distance between the two From points should be about the same as the distance between the centers of your eyes, i.e., about three inches or seven centimeters, measured in screen pixel units or whatever your printed map scale is.
- At
- Now, we choose a point that our eye is looking at, the At point. Generally this will be the center of the starmap, which will generally be at 0,0,0 in World co-ordinates. AtX = 0, AtY = 0, AtZ = 0. For two eyes, the At point is the same.
- Up
- Next, we need an Up point, which points in the eye's "upward" direction. For now, just set UpX = 0, UpY = 0, and UpZ = 1.
- Theta
- Finally we need Theta, the "viewing angle". This defines the cone of vision. Use 60 degrees for now. Other values can give a fisheye lense effect. Don't forget to convert the angle into radians if your programming language demands it. Multiply degrees by 0.017453293 to convert to radians.
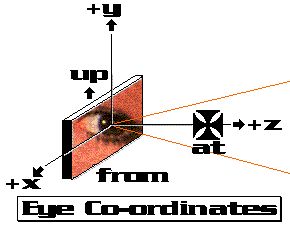
- Eye Co-Ordinates
- In the first step below, we will be converting World co-ords into Eye co-ords. In this co-ordinate system, the eye is at the origin, the positive Y axis will point upward, in the direction of the Up point, the positive X axis will point to the right, and the positive Z axis will extend into the screen going away from you, with the At point on the Z axis.
Now, wasn't that easy?
Here are the steps you need to do on each star in order to determine the screen or print-out co-ordinates. Again, remember that if you are creating a stereo twin picture as opposed to a rotatable starmap, one will have to run these steps twice, once for each eye.
- Convert World co-ords into Eye co-ords
- Make From point the origin
- Rotate X axis so At point lies on positive Z axis
- Rotate Y axis in the same way
- Rotate Z axis
- Perspective Transformation
After this it is up to you to display your data. For a Rotatable map, draw it on the monitor. For Stereo Twins, draw the data from the Left Eye in the left half of the screen/paper and the data from the Right Eye in the right half (for the wide-eyed method. For the cross-eyed method swap the halves). For Anaglyphs, print boths sets of data on top of each other, in colors based on the goggles. The right map color should be invisible through the left color goggle and vice versa.
Well, I guess it wasn't so easy after all!
Calculating steps 1A through 1D take an awful lot of calculations. The pros use the miracle of Matrix Algebra in order to combine all these into a handful of calculations.
Don't worry, I'll just show the details of the matrix for those who have the knowledge and the interest in it. The rest of us can skip down to the application of said matrix.
Step 1A
Step 1A is pretty simple:
- FCenterX = starX - FromX
- FCenterY = starY - FromY
- FCenterZ = starZ - FromZ
This changes the co-ords from World co-ords to World co-ords with the From point at the origin. (note that the above is for illustration only, we won't be using those equations in that form in our actual algorithm)
Steps 1B, 1C, and 1D
Now, don't panic, but here's the matrix that combines steps 1B, 1C, and 1D:
| a1x | a2x | a3x | 0 |
| a1y | a2y | a3y | 0 |
| a1z | a2z | a3z | 0 |
| 0 | 0 | 0 | 1 |
where:
- A1 =
a1x a2x a3x 0 - A2 =
a1y a2y a3y 0 - A3 =
a1z a2z a3z 0
To compute A1, A2, a' = At - From.
- A1 = (a' x Up) / ||a' x Up||
- A2 = ((a' x Up) x a') / ||(a' x Up) x a'||
- A3 = a' / ||a'||
where:
- x = the cross product of two vectors
- || z || = the magnitude of z
No, I'm not going to explain what those operation are.
Step 2
Step 2 is also simple:
- ScreenX = (EyeX * D) / EyeZ
- ScreenY = (EyeY * D) / EyeZ
where:
- D is the distance from the eye to the viewing plane, and is calculated from Theta. D = COS(Theta/2) / SIN(Theta/2)
This is just the fundamental law of perspective: The farther away it is from you, the smaller it appears. In this case, we are scaling it to go closer to the center of the screen, which is centered on At, the vanishing point.
Let A Computer Do It
Pseudocode
Since we've gotten that out of the way, I'll now show you how to do steps 1A-2 in a form suitable for programming. Note that the text in {italics} are comments, and are not part of the algorithm.
{As an example, when FromX,Y,Z is for the left eye, set it to -0.5,0,10 and +0.5,0,10 for the right eye. This puts the eyes hovering 10 units over the x-y plane, with the two eyes separated by 1.0 unit}
FromX = {user input}
FromY = {user input}
FromZ = {user input}
AtX = 0
AtY = 0
AtZ = 0
{ we are looking down at the map on the table, so "up" is in the +Y direction}
UpX = 0
UpY = 1
UpZ = 0
Theta = 60 * 0.017453293
DVal = COS(Theta / 2) / SIN(Theta / 2)
{ Compute a' }
aPrimeX = AtX - FromX
aPrimeY = AtY - FromY
aPrimeZ = AtZ - FromZ
{ Compute ||a'|| }
aPrimeMag = SQRT((aPrimeX^2) + (aPrimeY^2) + (aPrimeZ^2))
{ Fill the A3 section of the matrix with A3 = a' / ||a'|| }
A3X = aPrimeX / aPrimeMag
A3Y = aPrimeY / aPrimeMag
A3Z = aPrimeZ / aPrimeMag
{ Compute a' x Up }
TempX = (aPrimeY * UpZ) - (UpY * aPrimeZ)
TempY = (aPrimeZ * UpX) - (UpZ * aPrimeX)
TempZ = (aPrimeX * UpY) - (UpX * aPrimeY)
{ Compute ||a' x Up|| }
TempMag = SQRT((TempX^2) + (TempY^2) + (TempZ^2))
{ Fill the A1 section of the matrix with A1 = (a' x Up) / ||a' x Up|| }
A1X = TempX / TempMag
A1Y = TempY / TempMag
A1Z = TempZ / TempMag
{ Compute (a' x Up) x a' }
TempX = (A1Y * A3Z) - (A3Y * A1Z)
TempY = (A1Z * A3X) - (A3Z * A1X)
TempZ= (A1X * A3Y) - (A3X * A1Y)
{ Compute ||(a' x Up) x a'|| }
TempMag = SQRT((TempX^2) + (TempY^2) + (TempZ^2))
{ Fill the A2 section of the matrix with A2 = ((a' x Up) x a') / ||(a' x Up) x a'|| }
A2X = TempX / TempMag
A2Y = TempY / TempMag
A2Z = TempZ / TempMag
{ Compute offset for Step 1A }
OffX = -(A1X * FromX)-(A1Y*FromY)-(A1Z*FromZ)
OffY = -(A2X * FromX)-(A2Y*FromY)-(A2Z*FromZ)
OffZ = -(A3X * FromX)-(A3Y*FromY)-(A3Z*FromZ)
{ Initialization is finished. Now, for each StarX,StarY,StarZ, do the following: }
{ Convert star's World co-ords into Eye co-ords (steps 1A-1D) }
EyeX = (StarX * A1X) + (StarY * A1Y) + (StarZ * A1Z ) + OffX
EyeY = (StarX * A2X) + (StarY * A2Y) + (StarZ * A2Z ) + OffY
EyeZ = (StarX * A3X) + (StarY * A3Y) + (StarZ * A3Z ) + OffZ
{ Calculate perspective transform (step 2) }
ScreenX = (EyeX * DVal) / EyeZ
ScreenY = (EyeY * DVal) / EyeZ
Plot the star. Now do the next one.
When done, set FromX,Y,Z to the other eye, and do it all again.
Source Code
Here is a code fragment written in C implementing the above algorithm. You will have to change it a bit to make it work with your program (adding DeviceContexts to the "MoveTo" and "LineTo" commands if you are programming in Windows, etc.)
Warning
Again, I cannot guarantee that the above is error free. Beware. But have fun!
